The post Speed up your json2json transformation in SAP CPI with Groovyscript appeared first on INT4.
]]>In this article, you will learn how to:
- How to speed up JSON2JSON transformation using Groovy Script in SAP CPI
- How to parse and generate message structure in JSON format
- How to find more useful information for using Groovy Script in SAP CPI
Reading time: 6 minutes
Introduction
Recently I had a chance to review a book written by Eng Swee Yeoh and Vadim Klimov: Developing Groovy Scripts for SAP Cloud Platform Integration. The first thing that I have to admit is that reading this book was like reading an adventure book filled with a lot of mysteries. I spent a nice time reading the book and I have learned a lot of useful things regarding Groovy Script in SAP CPI. In this article, I want to share with you one of the concepts I have learned from the book – how you can speed up the transformation of JSON2JSON format.
Why I am writing about speeding up the process? As you know, in SAP Cloud Platform Integration you have the possibility to transform the JSON file from one structure to another JSON structure, but for this, you need to use JSON2XML converter and then XML2JSON converter. This unfortunately forces us to perform some additional steps that we could skip using Groovy Script in SAP CPI. In addition to this, you can use Groovy Script instead of graphical mapping which can be insufficient in very complex transformations.
Transform JSON2JSON with Groovy Script
Understanding our scenario
Let’s imagine that we have a scenario, where we want in SAP CPI transform the JSON format that contains all the shop transactions from specific day to JSON format, that contains only the total number of transactions, the total number of transactions made by credit card (for some statistical purpose) and the total cash flow in that particular day.
As shown below for this purpose we will use almost the same data that we used in my other blog SAP CPI – Combine in Sequence vs Combine Aggregation Algorithm.
In input JSON message to SAP CPI, you will send ShopName and Date. Then in the Transactions node, you will send ID, Article, Price, and Payment Type. Based on the data sent in input file after our transformation in Groovy Script we expect to have Shop and CreationDate in the header level and then ItemsNo (total number all of the transactions), CardItemsNo (total number of transactions made by credit card) and TotalAmount (made by all Payment Types). Our sample input message and output for this message can look like shown below:
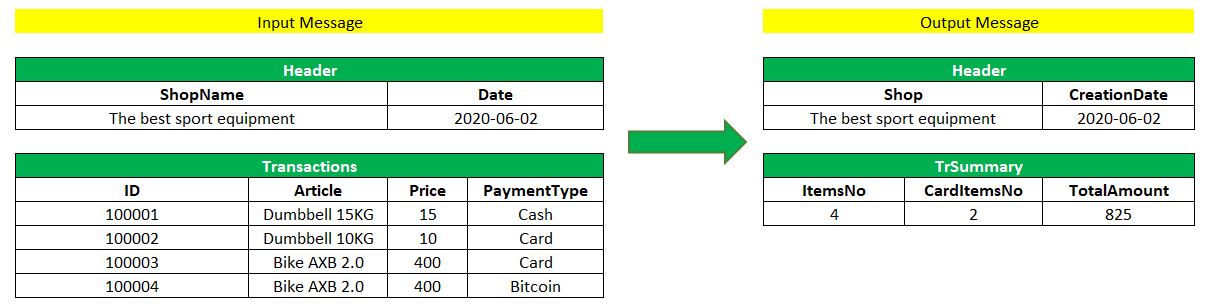
Please find JSON input data that I will use for my scenario:
{

  "ShoppingLog": {

    "Header": {

      "ShopName": "The best sport equipment",

      "Date": "2020-06-02"

    },

    "Transactions": [

      {

        "ID": "100001",

        "Article": "Dumbbell 15KG",

        "Price": 15,

        "PaymentType": "Cash"

      },

      {

        "ID": "100002",

        "Article": "Dumbbell 10KG",

        "Price": 10,

        "PaymentType": "Card"

      },

  {

        "ID": "100003",

        "Article": "Bike AXB 2.0",

        "Price": 400,

        "PaymentType": "Card"

      },

  {

        "ID": "100004",

        "Article": "Bike AXB 2.0",

        "Price": 400,

        "PaymentType": "Bitcoin"

      }

    ]

  }

}


And expected JSON output data:

{

    "Log": {

        "Header": {

            "Shop": "The best sport equipment",

            "CreationDate": "2020-06-02"

        },

        "TrCardSummary": {

            "ItemsNo": 4,

            "CardItemsNo": 2,

            "TotalAmount": 825.0

        }

    }

}
Parse JSON message
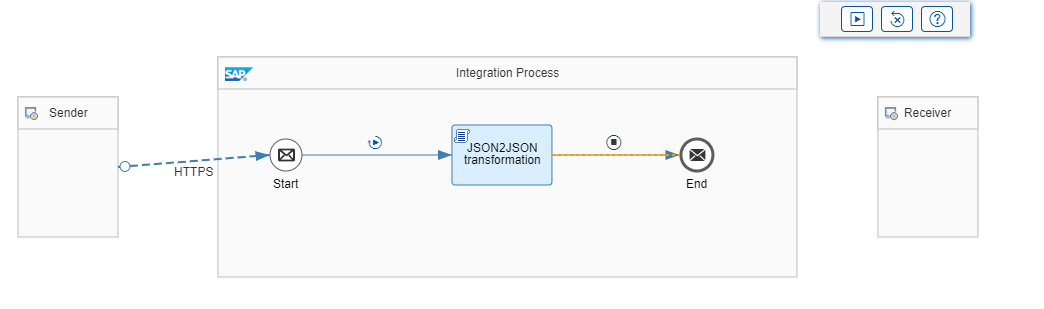
I created a very simple iflow, which main part is Groovy Script step: JSON2JSON transformation as shown below.
For the purpose of this blog, we don’t need to define any specific connection details, as all the steps can be simulated using Simulation Mode in SAP CPI. If you are not familiar with Simulation Mode, please check this excellent blog written by SAP.
In order to transform JSON2JSON in SAP CPI using Groovy Script as a first step, you need to deserialize data from JSON to Groovy Script objects. Only then you will be able to manipulate the data in Groovy. Fortunately, Groovy does all the work for us, because it provides ready and appropriate classes for this purpose:
- groovy.json.JsonSlurper that contains parse method and allows us to parse the input message in JSON format
- groovy.json.JsonBuilder allows us to generate really complex JSON documents that will be necessary to generate our output message.
The input JSON message will be accessed by Reader and then parsed by previously mentioned JsonSlurper as shown in the code snippet below.
Reader reader = message.getBody(Reader)
def input = new JsonSlurper().parse(reader)
Next, we will count the total number of transactions in number and the total number of Card transactions in numberCard. In order to count total number of transactions made by the Credit Card findAll method is used to filter only the transactions with PaymentType equal to Card. We also define the sum that is the sum of all prices in list Transactions.
def transactions = input.ShoppingLog.Transactions.findAll { item -> item.PaymentType == "Card" }
def numberCard = transactions.size()
def number = input.ShoppingLog.Transactions.size()
def sum = 0
input.ShoppingLog.Transactions.Price.each { Price -> sum += Price as Double }
Next, the builder will use the JSONBuilder to generate output JSON format. First, we will build the header with Shop and CreationDate. Next, the TrCardSummary node with ItemsNo, CardItemsNo and TotalAmount will be used.
def builder = new JsonBuilder()
builder.Log {
    'Header' {
        'Shop' input.ShoppingLog.Header.ShopName
        'CreationDate' input.ShoppingLog.Header.Date
    }

    'TrCardSummary' {
        'ItemsNo' number
        'CardItemsNo' numberCard
        'TotalAmount' sum
    }
}
You can find the whole code snippet explained above in one place below. You can just copy and paste it to your Groovy Script step in SAP CPI iflow.
import com.sap.gateway.ip.core.customdev.util.Message
import groovy.json.JsonBuilder
import groovy.json.JsonSlurper
import java.time.LocalDate
import java.time.format.DateTimeFormatter

def Message processData(Message message) {
    Reader reader = message.getBody(Reader)
    def input = new JsonSlurper().parse(reader)
    def transactions = input.ShoppingLog.Transactions.findAll { item -> item.PaymentType == "Card" }
    def numberCard = transactions.size()
    def number = input.ShoppingLog.Transactions.size()
    def sum = 0
    input.ShoppingLog.Transactions.Price.each { Price -> sum += Price as Double }

    def builder = new JsonBuilder()
    builder.Log {
        'Header' {
            'Shop' input.ShoppingLog.Header.ShopName
            'CreationDate' input.ShoppingLog.Header.Date
        }

        'TrCardSummary' {
            'ItemsNo' number
            'CardItemsNo' numberCard
            'TotalAmount' sum
        }
    }
    message.setBody(builder.toPrettyString())
    return message
Simulation of JSON2JSON transformation in SAP CPI
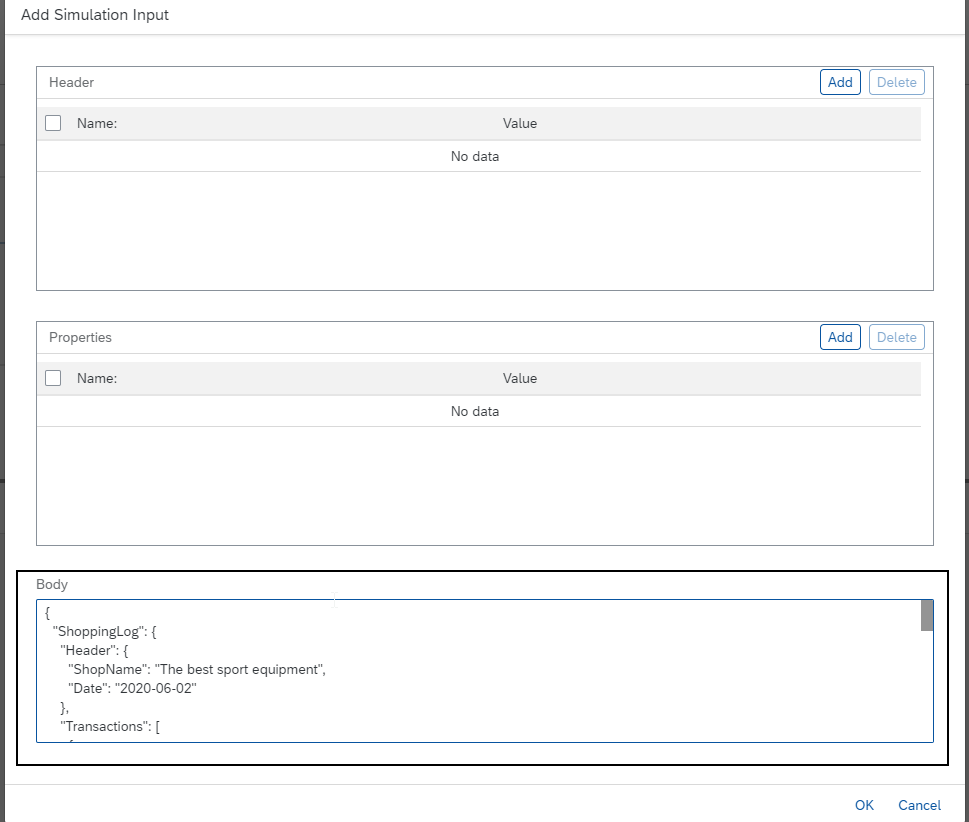
If you want to test your scenario you can paste the input data I provided at the beginning of the article to the Body section in Simulation Input Step.
Then after running the simulation you should get exactly the same output as I also provided at the beginning of the article and as shown below.
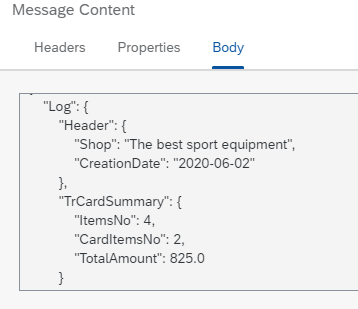
Ideally, after transformation, you should see, that the total number of transactions from the input file is equal to 4 and that only 2 transactions have been recognized as the ones paid by Card. At the and sum of all transactions should be equal to 825.0.
Summary of JSON2JSON transformation scenario
I hope that you find this method very useful and easy to transform JSON input to the JSON output format. As you could see, a very simple script with the usage of JSONSlurper and JSONBuilder can help us build very sophisticated transformations.
I was really excited when I have learned it from the book by Eng Swee and Vadim. If you like this blog and you are hungry for more Groovy Script real-life examples in SAP CPI – you have to get acquainted with this book. Apart from transformations from JSON2JON or XML2XML using Groovy you will learn also from the book:
- The basic Groovy syntax and commands
- How to configure your development environment
- How to test your scripts and how to follow the test-driven development methodology
- How to access SAP CPI internal frameworks
- And much much more!
Please let me in comments if you are currently using Groovy Script in SAP CPI and for which scenarios do you use it?
The post Speed up your json2json transformation in SAP CPI with Groovyscript appeared first on INT4.
]]>The post SAP CPI – Combine in Sequence vs Combine Aggregation Algorithm appeared first on INT4.
]]>In this article you will learn:
- How to use and configure from scratch Aggregator pattern in SAP CPI
- What is the difference in practice between Aggregation Algorithm Combine and Combine in Sequence
- How to monitor your integration flow with Aggregator pattern
Introduction
In this blog, I will guide you on how to create a sample integration flow in SAP CPI, that uses the Aggregator pattern. The aim of this blog is to show you how different aggregation algorithms work (combine vs. combine in sequence ). In our sample flow, we will use the HTTPS adapter type for inbound communication. We will send some test messages from Postman to our SAP CPI tenant, then we will use two types of Aggregation Algorithm in Aggregator pattern and in the end, we will store the log to be able to compare differences.
I hope that you will find some useful hints in this article, that you could then use in the integration battlefield!
SAP CPI flow with Aggregator pattern in practice
General integration flow configuration
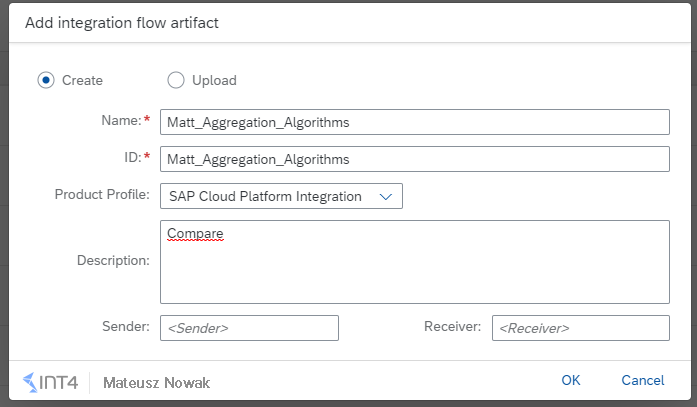
Let’s start with the creation of the Integration Flow. Go to the Design tab in your SAP CPI tenant, open your package and create a new Integration Flow as shown below.
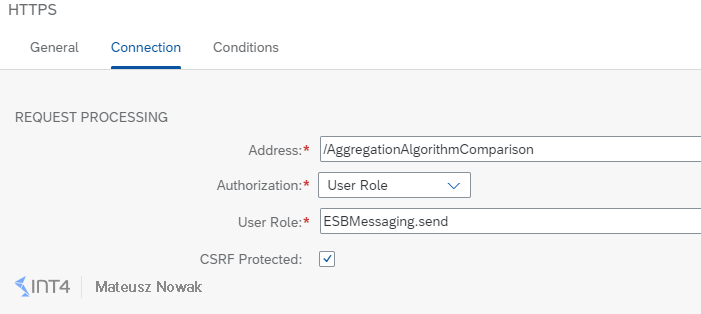
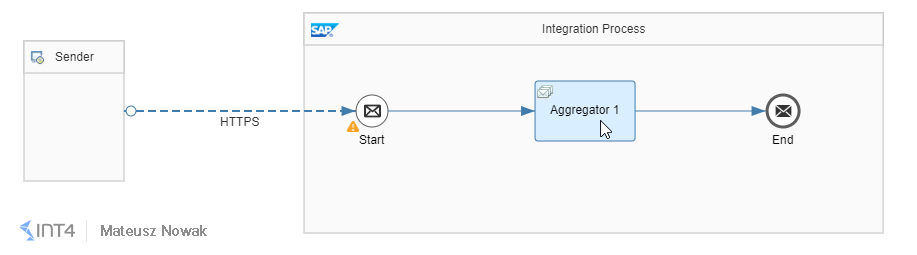
First of all, define inbound communication by connecting the Sender with the Start event. For the purpose of this example, please use the HTTPS adapter type.

In the details of the Connection tab provide /AggregationAlgorithmComparison as the address, UserRole as Authorization and ESBMessaging.send as a UserRole.
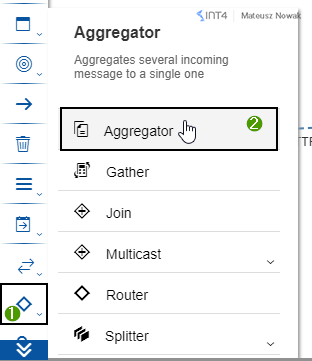
Then from the Message Routing tab, choose Aggregator pattern and place it between Start and End events. Change the name of the Aggregator to Aggregate Messages in the General tab. We will come back to the Aggregator configuration later.
Now from the Message Transformers tab choose Scripts and then choose Groovy Script. Place it between Aggregator and End Event.
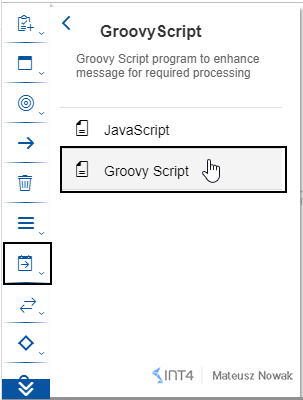
Click on the Groovy Script that you added, change the name to Store Payload and add a new script by clicking on the Create (+) icon. Copy the following lines of code from code snippet to the script and then click OK.
import com.sap.gateway.ip.core.customdev.util.Message

def Message processData(Message message) {

def reader = message.getBody(Reader)

def messageLog = messageLogFactory.getMessageLog(message)

if (messageLog)

messageLog.addAttachmentAsString("Payload", reader.getText(), "text/xml");

return message

}
Alternatively, you could use Trace mode for integration flow to see the payload, but for the purpose of the example let’s store it using Groovy Script – it will allow you to have quicker access to the payload.
Save the integration flow. So far it should look as shown below:
Aggregator Pattern Configuration
Now it is time for aggregator pattern configuration. For both aggregation algorithms, we will send exactly the same 6 messages in exactly the same order. Thanks to this we will be able to compare the results after processing both algorithms.
We will send 6 messages with the log from the cashes from 2 stores: Sport ABC and Matt. Our goal is to aggregate all messages that are being sent in the time frame of 2 minutes based on Shop Name.
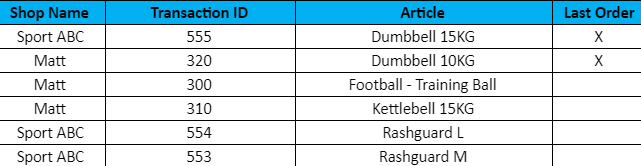
Based on the example messages shown in the table above we would expect to receive 2 messages with all transactions per specific store considering the fact that the time between receiving those messages doesn’t exceed 2 minutes.
Below you can see a code snippet that contains all 6 XML messages that we will send after configuration of the Aggregator step.
<!-- 1st Message -->

<ShoppingLog>

<ShopName>Sport ABC</ShopName>

<TransactionID>555</TransactionID>

<Article>Dumbbell 15KG</Article>

<Quantity>1</Quantity>

<Price>15</Price>

<Currency>EUR</Currency>

<LastOrder>X</LastOrder>

</ShoppingLog>


<!-- 2nd Message -->

<ShoppingLog>

<ShopName>Matt</ShopName>

<TransactionID>320</TransactionID>

<Article>Dumbbell 10KG </Article>

<Quantity>1</Quantity>

<Price>14</Price>

<Currency>EUR</Currency>

<LastOrder>X</LastOrder>

</ShoppingLog>


<!-- 3rd Message -->

<ShoppingLog>

<ShopName>Matt</ShopName>

<TransactionID>300</TransactionID>

<Article>Football - Training Ball</Article>

<Quantity>3</Quantity>

<Price>18</Price>

<Currency>EUR</Currency>

</ShoppingLog>


<!-- 4th Message -->

<ShoppingLog>

<ShopName>Matt</ShopName>

<TransactionID>310</TransactionID>

<Article>Kettlebell 15 KG</Article>

<Quantity>5</Quantity>

<Price>12</Price>

<Currency>EUR</Currency>

</ShoppingLog>


<!-- 5th Message -->

<ShoppingLog>

<ShopName>Sport ABC</ShopName>

<TransactionID>554</TransactionID>

<Article>Rashguard L </Article>

<Quantity>3</Quantity>

<Price>25</Price>

<Currency>EUR</Currency>

</ShoppingLog>


<!-- 6th Message -->

<ShoppingLog>

<ShopName>Sport ABC</ShopName>

<TransactionID>553</TransactionID>

<Article>Rashguard M </Article>

<Quantity>3</Quantity>

<Price>25</Price>

<Currency>EUR</Currency>

</ShoppingLog>
Combine in Sequence Aggregation Algorithm
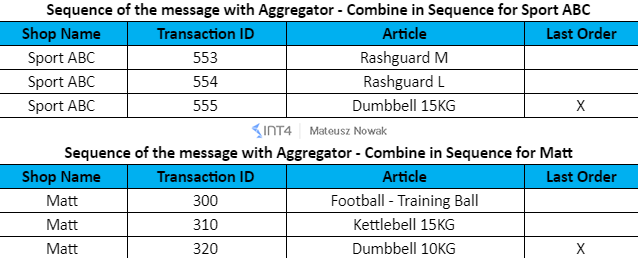
First, we will design the flow for the scenario, where messages should be aggregated based on the ShopName, in the sequence determined by the TransactionID. As mentioned before, the maximum time between 2 messages should not exceed 2 minutes for the aggregation.
Considering all the conditions above, in the end, we should have two messages with the following data:
Ok, let’s have some fun configuring such a scenario!
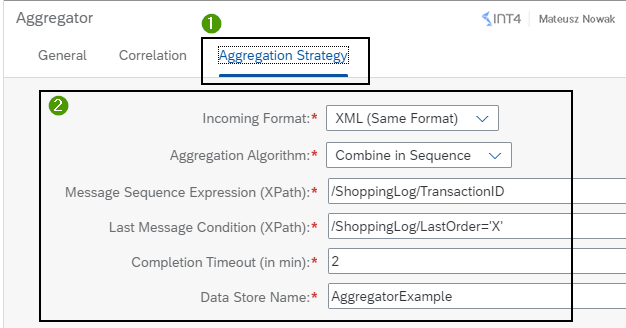
Click on the Aggregate Messages step and go to the Correlation Tab. In the Correlation Expression (XPath) we have to define the path to the node, based on which we want to aggregate messages. It means that all the messages with the same value in this particular node will be merged into one message. In our example this is Shop Name, so use the following Xpath: /ShoppingLog/ShopName.

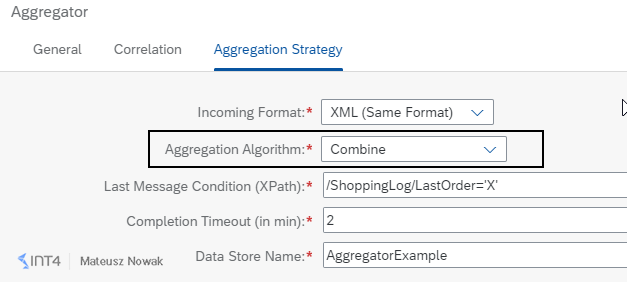
Next, go to the Aggregation Strategy tab. Here we have to provide:
- Incoming Format: XML (Same Format)
This is the only option that currently can be chosen. Note: Aggregator pattern supports only XMLs that are in the same format. - Aggregation Algorithm: Combine in Sequence
All the messages that will be received in the timeframe of 2 minutes will be first sorted based on the message sequence expression and only afterward they will be processed. - Message Sequence Expression (XPath): /ShoppingLog/TransactionID
Contains XPath to the node based on which sequence is defined. What is important in this step, is the fact that the Sequence number cannot be larger than 100000. Considering this, it can be quite hard to use for example, timestamp field for message sequence expression. - Last Message Condition (XPath): /ShoppingLog/LastOrder=’X’
Contains XPath to the node based on which Aggregator finishes the current aggregation. For example, if the message with value ‘X’ will be sent in the LastOrder node, the next message that will be sent even for the same ShopName within 2 minutes will not be aggregated with the previous messages. - Completion Timeout (in min): 2
- Data Store Name: AggregatorExample
Name of your local data store.
Well done! You have just configured the Aggregator pattern with Combine in Sequence algorithm. Save your integration flow and deploy it.
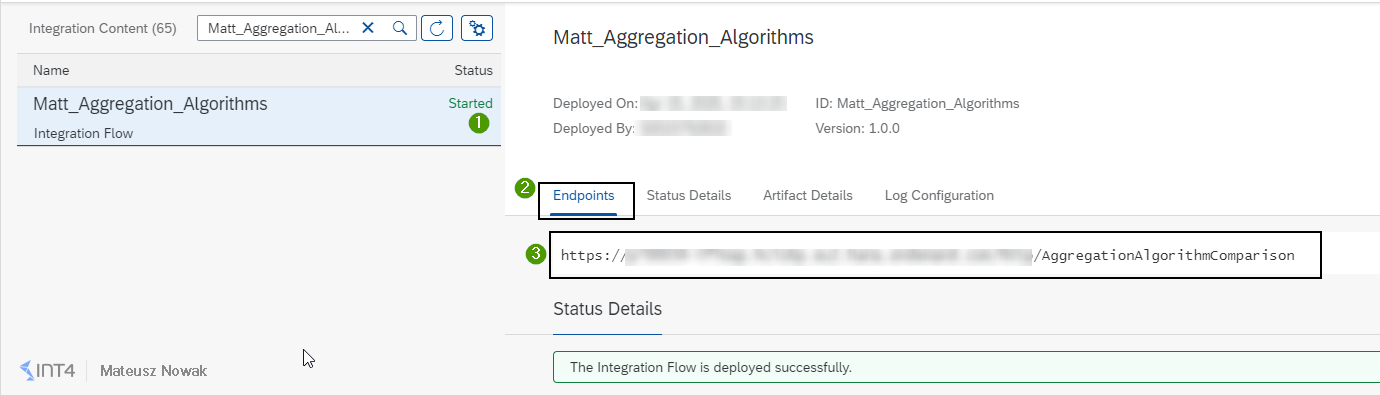
Now go to the Operations View and then to the Manage Integration Content to make sure that your integration flow has started successfully. Then copy the endpoint URL that we will use to send messages from the Postman.
In the Postman paste the URL to your integration flow endpoint, provide Basic Authentication to your SAP CPI tenant with authorization for ESBMessage.send, go to the Body tap, choose raw data format and paste the first XML message and then click Send.
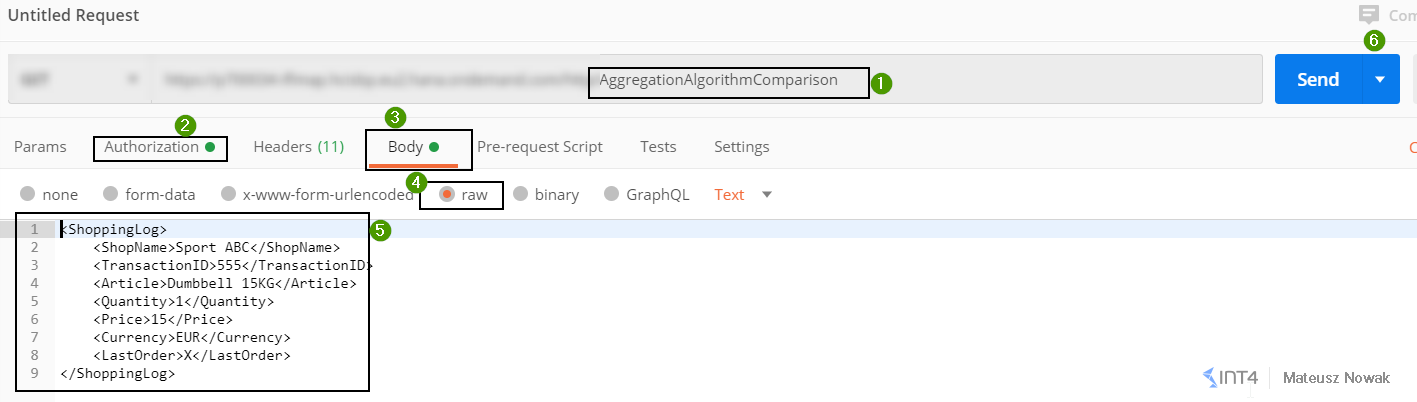
Send all 6 messages one by one from the code snippet above.
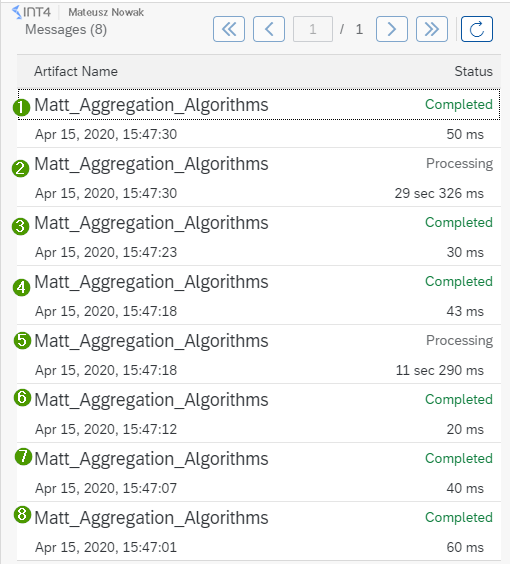
Now you can go to the SAP CPI Operations View in order to see processed messages in the Monitor Message processing. Ideally, you should see 8 messages for your integration flow. You can see 6 messages you sent from the Postman and two additional messages (2nd and 5th) that are still processing. Those 6 messages are the ones that have been received to the Aggregator and the other 2 that contain the aggregated messages in the data store.
Once the messages with aggregated messages are completed you can go into details, where you should see an extended log for runs, that consist of 4 messages.
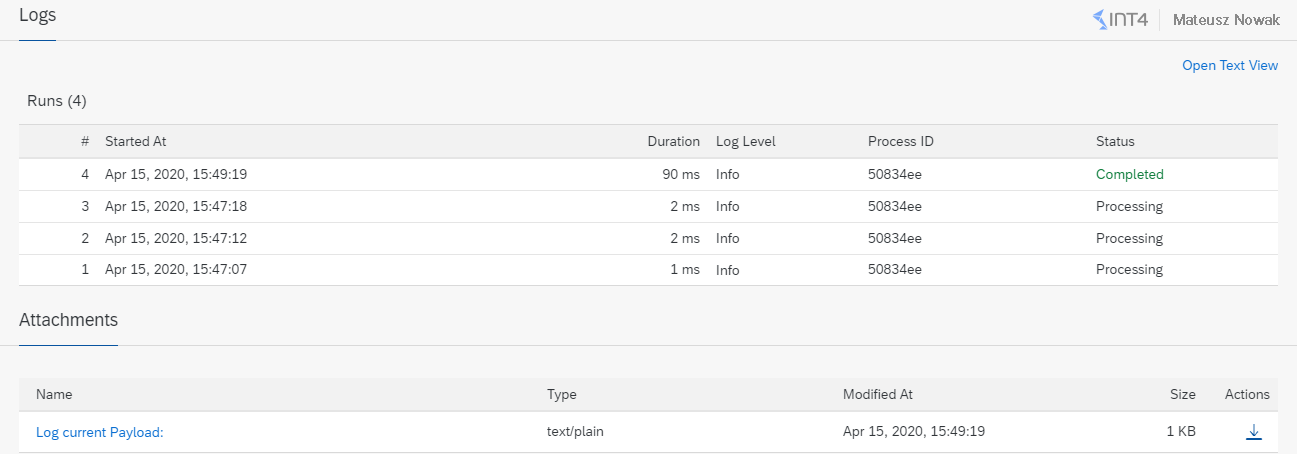
In order to make sure that our messages have been correctly aggregated, let’s see logs with the payload for both of them.
Log for the Shop Name: Matt. As you can see the output of the aggregation is wrapped in <multimap:Message1> node.
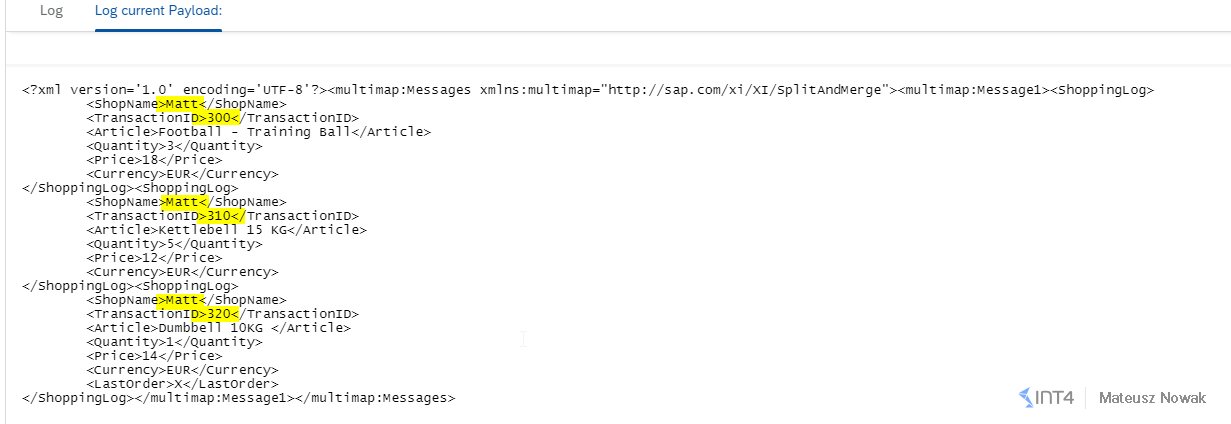
- The message contains only the messages with ShopName Matt – correct 🙂
- Originally messages were sent in the following order by transaction ID: 320, 300, 310. In log we can see that messages were sorted based on Transaction ID and in the log we can see them in the correct order- 300, 310, 320 – correct 🙂
Log for the Shop Name: Sport ABC.
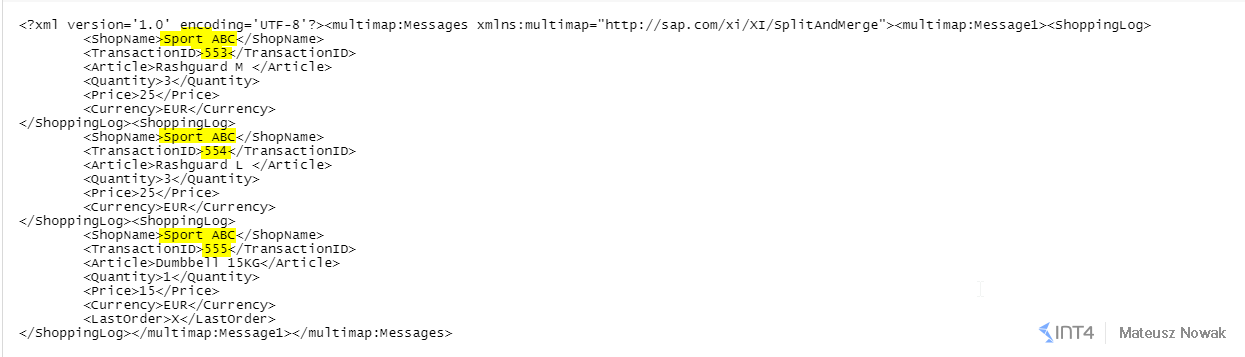
- The message contains only the messages with ShopName Sport ABC – correct 🙂
- Originally messages were sent in the following order by transaction ID: 555, 554, 553. In the log we can see that messages were sorted based on Transaction ID and in the log we can see them in the correct order- 553, 554, 555 – correct 🙂
Nicely done! Your first scenario with Combine in Sequence Aggregation Algorithm is working as expected.
Combine Aggregation Algorithm
In order to compare the Combine in Sequence vs. Combine aggregation algorithm, let’s go back to your integration flow, jump to the Aggregate Messages step and go to the Aggregation Strategy tab. Change the Aggregation Algorithm from Combine in Sequence to Combine. The field Message Sequence Expression (XPath) should disappear as shown below.
Save your integration flow, deploy and once it’s successfully Started to go to the Postman and send all six messages in exactly the same order as previous.
What do we expect in the results in your opinion? Will we have again 2 messages that contain 3 separate messages merged?
I think you already guessed that this is not true. Why is that? Before answering this question, let’s look at our message in the Monitor for processed messages. We will have more messages at the first glance in comparison to a combined sequence algorithm, as shown below. Instead of 8 messages – we will have 10 messages.
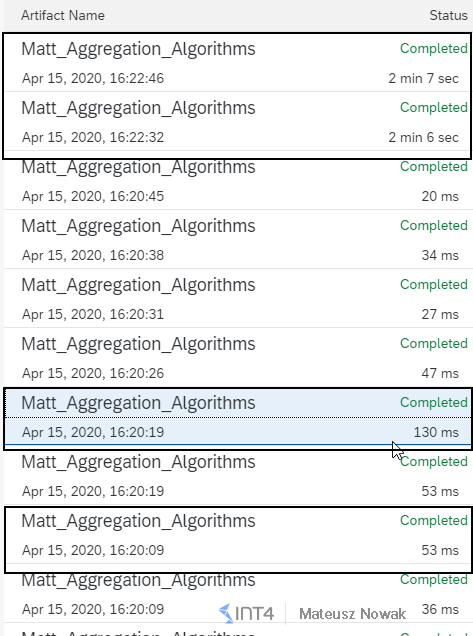
Again, we will have six messages that have been directly sent via the Postman, but instead of 2 aggregated messages, we will see 4 messages in SAP CPI Monitor. This is because the first messages that you sent contained also the indicator for the last message – value ‘X’ in the LastOrder. Since SAP CPI aggregation Combine was not in sequence – messages have been processed in the order they were sent.

As a proof, we can see below code snippet containing 4 payloads from the aggregated messages. Each payload is aggregated between <multimap:Messages> node.
<!-- Payload from 1st aggregated message -->

<?xml version='1.0' encoding='UTF-8'?><multimap:Messages xmlns:multimap="http://sap.com/xi/XI/SplitAndMerge"><multimap:Message1><ShoppingLog>

<ShopName>Sport ABC</ShopName>

<TransactionID>555</TransactionID>

<Article>Dumbbell 15KG</Article>

<Quantity>1</Quantity>

<Price>15</Price>

<Currency>EUR</Currency>

<LastOrder>X</LastOrder>

</ShoppingLog></multimap:Message1></multimap:Messages>


<!-- Payload from 2nd aggregated message -->

<?xml version='1.0' encoding='UTF-8'?><multimap:Messages xmlns:multimap="http://sap.com/xi/XI/SplitAndMerge"><multimap:Message1><ShoppingLog>

<ShopName>Matt</ShopName>

<TransactionID>320</TransactionID>

<Article>Dumbbell 10KG </Article>

<Quantity>1</Quantity>

<Price>14</Price>

<Currency>EUR</Currency>

<LastOrder>X</LastOrder>

</ShoppingLog></multimap:Message1></multimap:Messages>


<!-- Payload from 3rd aggregated message -->

<?xml version='1.0' encoding='UTF-8'?><multimap:Messages xmlns:multimap="http://sap.com/xi/XI/SplitAndMerge"><multimap:Message1><ShoppingLog>

<ShopName>Matt</ShopName>

<TransactionID>300</TransactionID>

<Article>Football - Training Ball</Article>

<Quantity>3</Quantity>

<Price>18</Price>

<Currency>EUR</Currency>

</ShoppingLog><ShoppingLog>

<ShopName>Matt</ShopName>

<TransactionID>310</TransactionID>

<Article>Kettlebell 15 KG</Article>

<Quantity>5</Quantity>

<Price>12</Price>

<Currency>EUR</Currency>

</ShoppingLog></multimap:Message1></multimap:Messages>


<!-- Payload from 4th aggregated message -->

<?xml version='1.0' encoding='UTF-8'?><multimap:Messages xmlns:multimap="http://sap.com/xi/XI/SplitAndMerge"><multimap:Message1><ShoppingLog>

<ShopName>Sport ABC</ShopName>

<TransactionID>554</TransactionID>

<Article>Rashguard L </Article>

<Quantity>3</Quantity>

<Price>25</Price>

<Currency>EUR</Currency>

</ShoppingLog><ShoppingLog>

<ShopName>Sport ABC</ShopName>

<TransactionID>553</TransactionID>

<Article>Rashguard M </Article>

<Quantity>3</Quantity>

<Price>25</Price>

<Currency>EUR</Currency>

</ShoppingLog></multimap:Message1></multimap:Messages>
SAP CPI Combine in Sequence vs Combine Aggregation Algorithms summary
Congratulations! If you are reading this, it means that you went through both aggregation algorithms and you are aware of the major differences between them. You have configured the scenario, where all messages from specific ShopName that have been received within a 2 minutes time frame should be mapped together. Additionally, you used the last message condition in LastOrder, which allowed you to determine when specific aggregation should be finished and you were able to see how it affected the aggregation when the sequence is used or not. You can call yourself the SAP CPI Aggregator Ninja now! 🙂
I also truly recommend you to visit SAP Help for the Aggregator pattern. You can also find more blogs about SAP Integration and SAP CPI on our blog, for example here you can find amazing Andrzej’s blog where he shows how to control messages with a custom header.
If you are reading this before the 30th of April, you still have the opportunity to get one of our SAP Press books – just take part in the SAP CPI challenge prepared by Eng Swee Yeoh.
Do you use Aggregator quite often in your scenarios? What aggregation algorithms do you use then? Let us know in the comments!
The post SAP CPI – Combine in Sequence vs Combine Aggregation Algorithm appeared first on INT4.
]]>The post How to automatically compare workbench objects between different SAP systems? appeared first on INT4.
]]>In this article, I will show you how you can in easy and almost automate way compare objects between different SAP systems.
Read and learn:
- how to perform automatic workbench objects comparison between different SAP systems
- why is the objects comparison between different SAP systems important
- how to compare workbench objects different between different SAP systems
Why should I care about objects comparison between different SAP systems?
Have you ever had to perform retrofit activities between two or more systems? I hope you can agree, that on the one hand, this is a very tedious and repetitive activity, but on the other hand, it is very crucial. Obviously after retrofitting you want to be sure, that on both SAP systems the same objects have the same version and that logic in your code is exactly the same.
Retrofitting activities are not the only scenario where you compare these objects. Let’s get right to the point on how to speed up the process of comparing objects between SAP instances.
How to compare workbench objects different between different SAP systems?
At the beginning, I compared my objects manually, but after 2 hours I had enough. I started my research and I found a standard SAP report, that immediately became my best friend.
The only prerequisite that you need to in order to use that report is the ABAP RFC connection between the current system and the system that is the subject to comparison.
Once you have your RFC connection available, you can start your play with the report: RSSYSCOMP
When you execute the program you have various options to choose based on which you can compare your objects between two SAP systems.
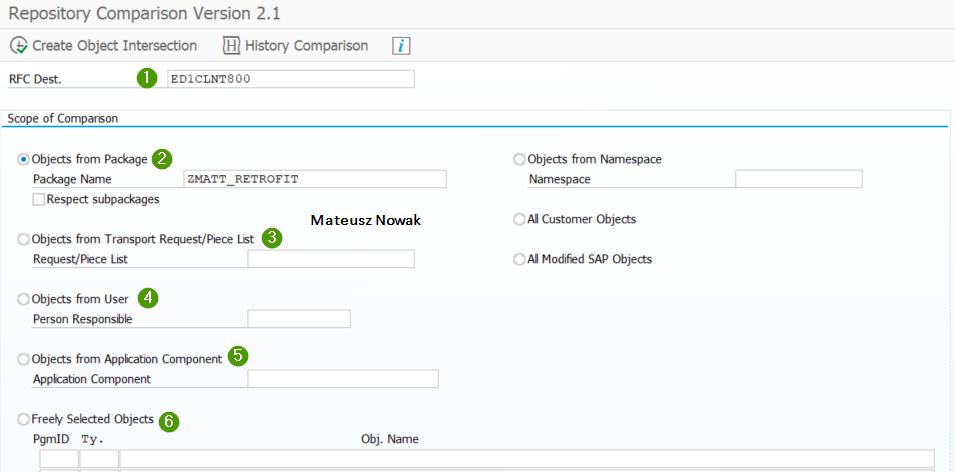
Let me describe the most useful (in my opinion) options:
- RFC Dest. – RFC destination name to the system that will be compared with the system on which you are logged in.
- Object from Package – This is my favorite option. Imagine that you have hundreds of transports, but you know that all your objects, programs, classes are in one, specific package. You can provide a package name and the program will compare all objects from the package you provided!
- Object from Transport Request/Piece List- It allows you to provide the specific Transport Number and all workbench objects from this transport will be compared.
- Object from User – As the name suggests, this option will check all the objects assigned to the user you have chosen.
- Object from Application Component – All the objects from the specific application component will be compared.
- Freely Selected Objects – You can provide specific object ID, type and name and only these objects that you directly defined will be compared. I found this option useful when first I checked different packages. Then, from based on the result of comparison I knew that only a few objects were different on two systems.
Let’s see how the comparison works based on the first option (my favorite one), which is a comparison based on the package name. Once you provide RFC destination and package name, you need to click the Create Object Intersection button.
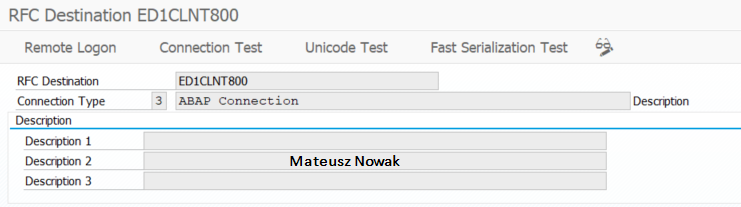
In the first step, the report will collect information about the objects that exist in the current system and the one for which you use the RFC connection. In my case, it compared objects from ED1 and S42 systems, as you can see below.

On the left-hand side (1) you can see objects that exist only in the current system, but they don’t exist in the second SAP system.
On the right-hand side (2) you will have the list of objects that exist in the second SAP system. They don’t exist in the current system. In my case, you can see that table ZMATT_RETRO_0001 doesn’t exist int he current system. Based on the further analysis I can decide if I want to transport this object to the current system, create it manually or leave it as it is.
Finally, in the middle section (3) you will see objects that exist in both systems. You can select all the objects and then click the button Version Comparison. By doing so, the report will compare objects between these two SAP systems automatically!
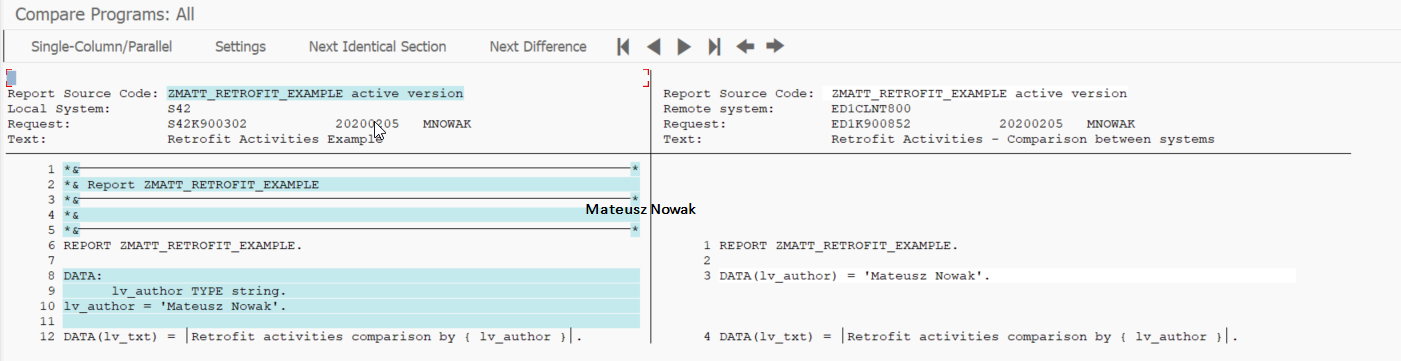
As you can see below I have only two objects in my package, but imagine the real-life situation, where you have thousands of objects in a specific package – this can save you a lot of time. You can see the summary with information on how many objects have been compared, how many of them are OK and how many of them differ. I can select here even specific objects and see differences immediately by clicking Object Comparison.

Once you do it, you will be redirected to the window that you know pretty well. In my case, I can see that the logic is the same, but the way how it was written differs. Now it’s the time to decide whether we should adjust the version of the report, which version should be adjusted and so on, but this is not the subject of our matter.
Summary
Do you find this report useful in terms of massive comparison of the objects on your SAP systems? Maybe you know any other great reports, classes, function modules that speed up different processes?
Let us know in the comment!
The post How to automatically compare workbench objects between different SAP systems? appeared first on INT4.
]]>The post How to use CASE in new Open SQL appeared first on INT4.
]]>From this blog post you will learn:
- How to use a CASE expression in the new Open SQL
In this short blog, I would like to show you how to use a CASE expression in the new Open SQL.
I have learned about it from my colleague, Michal Jakubowicz, who recently conducted a full 4-days workshop about ABAP Programming for SAP Hana.
The CASE expression in new Open SQL is available on ABAP 7.4 SP08. In this blog, we will focus on the scenario, in which we will select different columns in one select statement, based on the content in another column.
New Case expression in SELECT statement – example
Let’s consider, that you have to fill the internal table that contains three fields: VBELN, MATKL, and MATERIAL_ID. You have to fill VBELN and MATKL directly from VBAP table with Sales Document Number and Material Group. The field MATERIAL_ID you have to field based on the value in the Material Group:
If the Material Group is equal to Trading Materials (L001), then fill MATERIAL_ID with Material Number from VBELN (MATNR field)
If the Material Group is equal to Finished Goods (L004), then fill MATERIAL_ID with Description from VBELN (ARKTX field)
If Material Group is other than Trading Materials and Finished Goods – leave the MATERIAL_ID field empty.
In order to do it directly in the SELECT statement – you can use the following code snippet:
SELECT vbeln, matkl,
CASE MATKL
WHEN ‘L001’ THEN matnr
WHEN ‘L004’ THEN arktx
ELSE ‘ ‘
END AS material_id
FROM vbap
INTO TABLE @gt_outtab
WHERE vbeln IN @so_vbeln[].The entries in VBAP table look as follows:
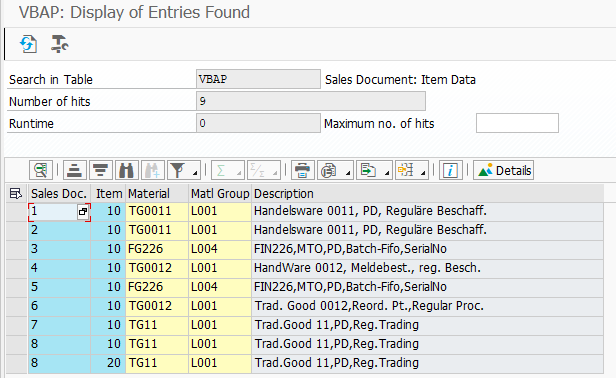
And the result of the SELECT with CASE expressions is the following:

As you can see, for Sales Document 3 and 5, that are Finished Goods – Description field instead of Material Number field was chosen. Thanks to CASE expression you don’t have to use two, separate SELECT statements or use additional LOOP statements to accomplish such task.
Please let us know if you like such content!
The post How to use CASE in new Open SQL appeared first on INT4.
]]>